Welcome to another edition of the ADAPTIVE FITBUNCH – Hopefully you’re enjoying them as much as I am enjoying researching and writing them. This series is catered specifically to lower-limb amputees, as well as other adaptive athletes who are lacking lower-limb functionality. I hope to also shed light for able-bodied individuals as well, on what it’s like to train as an adaptive athlete. If you or someone you know is an amputee or other adaptive athlete and would like to Guest Post regarding fitness as it pertains to “disability”, please reach out to trevor@fitbunch.net – I’d love to turn this site into a viable resource for every adaptive athlete!
What is the core?
“Core training” is perhaps one of the most overused and abused ideas within physical fitness. Every week, there’s some new fitness gizmo being released with promises of absolutely “shredding your core” or helping you gain “six pack abs” Aside from their own misplaced intentions (really, the companies making these devices are just looking for your cash to make it into their wallet) – most of these new and trendy toys are pretty ineffective when it comes to training the muscles of the core.
 So, what is the core? Without getting too specific just yet, your core is pretty much your entire midsection, including lower-back and gluteal musculature. Most of the time the core is referred to as the abdominals and the obliques, but this is only a portion of the whole picture. Training the core without properly addressing the entire structure and each of it’s functions is a disservice to yourself and can result in muscular imbalance and lead to eventual injury (no bueno).
What does the core do?
Your core acts in instances of both force transfer and stabilization. This is incredibly important to amputees. Let’s talk first about stabilization. If you’ve kept up on the Adaptive FitBunch articles, you may recall a concept called dynamic balance – the idea that lower limb amputees never truly stand still, we are always at work one way or another to stay upright. This dynamic balance is, in large part, the work of the core. Unfortunately, without a strong and well balanced core, most of this work falls on the muscles of the low back (does your lower back get sore after a long day of prosthetic use? or conversely, are you spending the majority of the time seated? i.e. in a wheelchair, desk job, etc). Force transfer is the other side of the coin. In addition to stabilizing, the core works to absorb and distribute different external forces as they act upon our body. How many times across your day do you get bumped into, have a missed step, or catch yourself from falling? This is your core hard at work (or not working, depending on the end result) to transfer forces as they act upon you from the outside.
Unfortunately, most “core” or “abs training” workouts that you’ll come across fail to directly address the core from a functional standpoint. Instead, these dime-a-dozen workouts will often focus on training the core as a prime mover (exercises like crunches and back extensions) and in isolation (dumbbell side bends). These exercises do have their time and place, but are inadequate for building increased functionality for our day-to-day lives. The core of the lower limb amputee is best trained in an integrated and varied manner that accounts for the specific type of challenges that we encounter daily.
What to do?
Alright, so we’ve got a pretty good idea now of exactly what it is that our core does, and how it functions for us. The next step is to practically incorporate some new movements into our own physical training that help address core stability and enhance overall functionality.
This article is coming from the standpoint of a bilateral above knee amputee; if you are of a different amputation level, you can definitely make these exercises accessible, but they may require some adaptations. Since I am a full time prosthetic user, wearing my prostheses for anywhere between 12-17 hours daily, I will be performing each movement using my daily prostheses (C-Leg 4 with Hanger ComfortFlex direct skin-fit suction sockets). It is entirely possible that you will be able to perform these movements with other suspension/knee/feet systems, but these are what works best for me.
To keep things simple, we are going to divide our movements into two different “classes”
- Stability – these are exercises that will help enhance overall stability of the core as well as stabilization of the spine.
- Antirotation – these are exercises designed to prevent rotation and/or lateral flexion of the spine
Core Stability Training
Core stability is the first subject that we will tackle. These movements are a great starting point for anyone, but are also fantastic to revisit as a more advanced trainee. Perform each movement with the best form that you possibly can, and never sacrifice form for more repetitions.
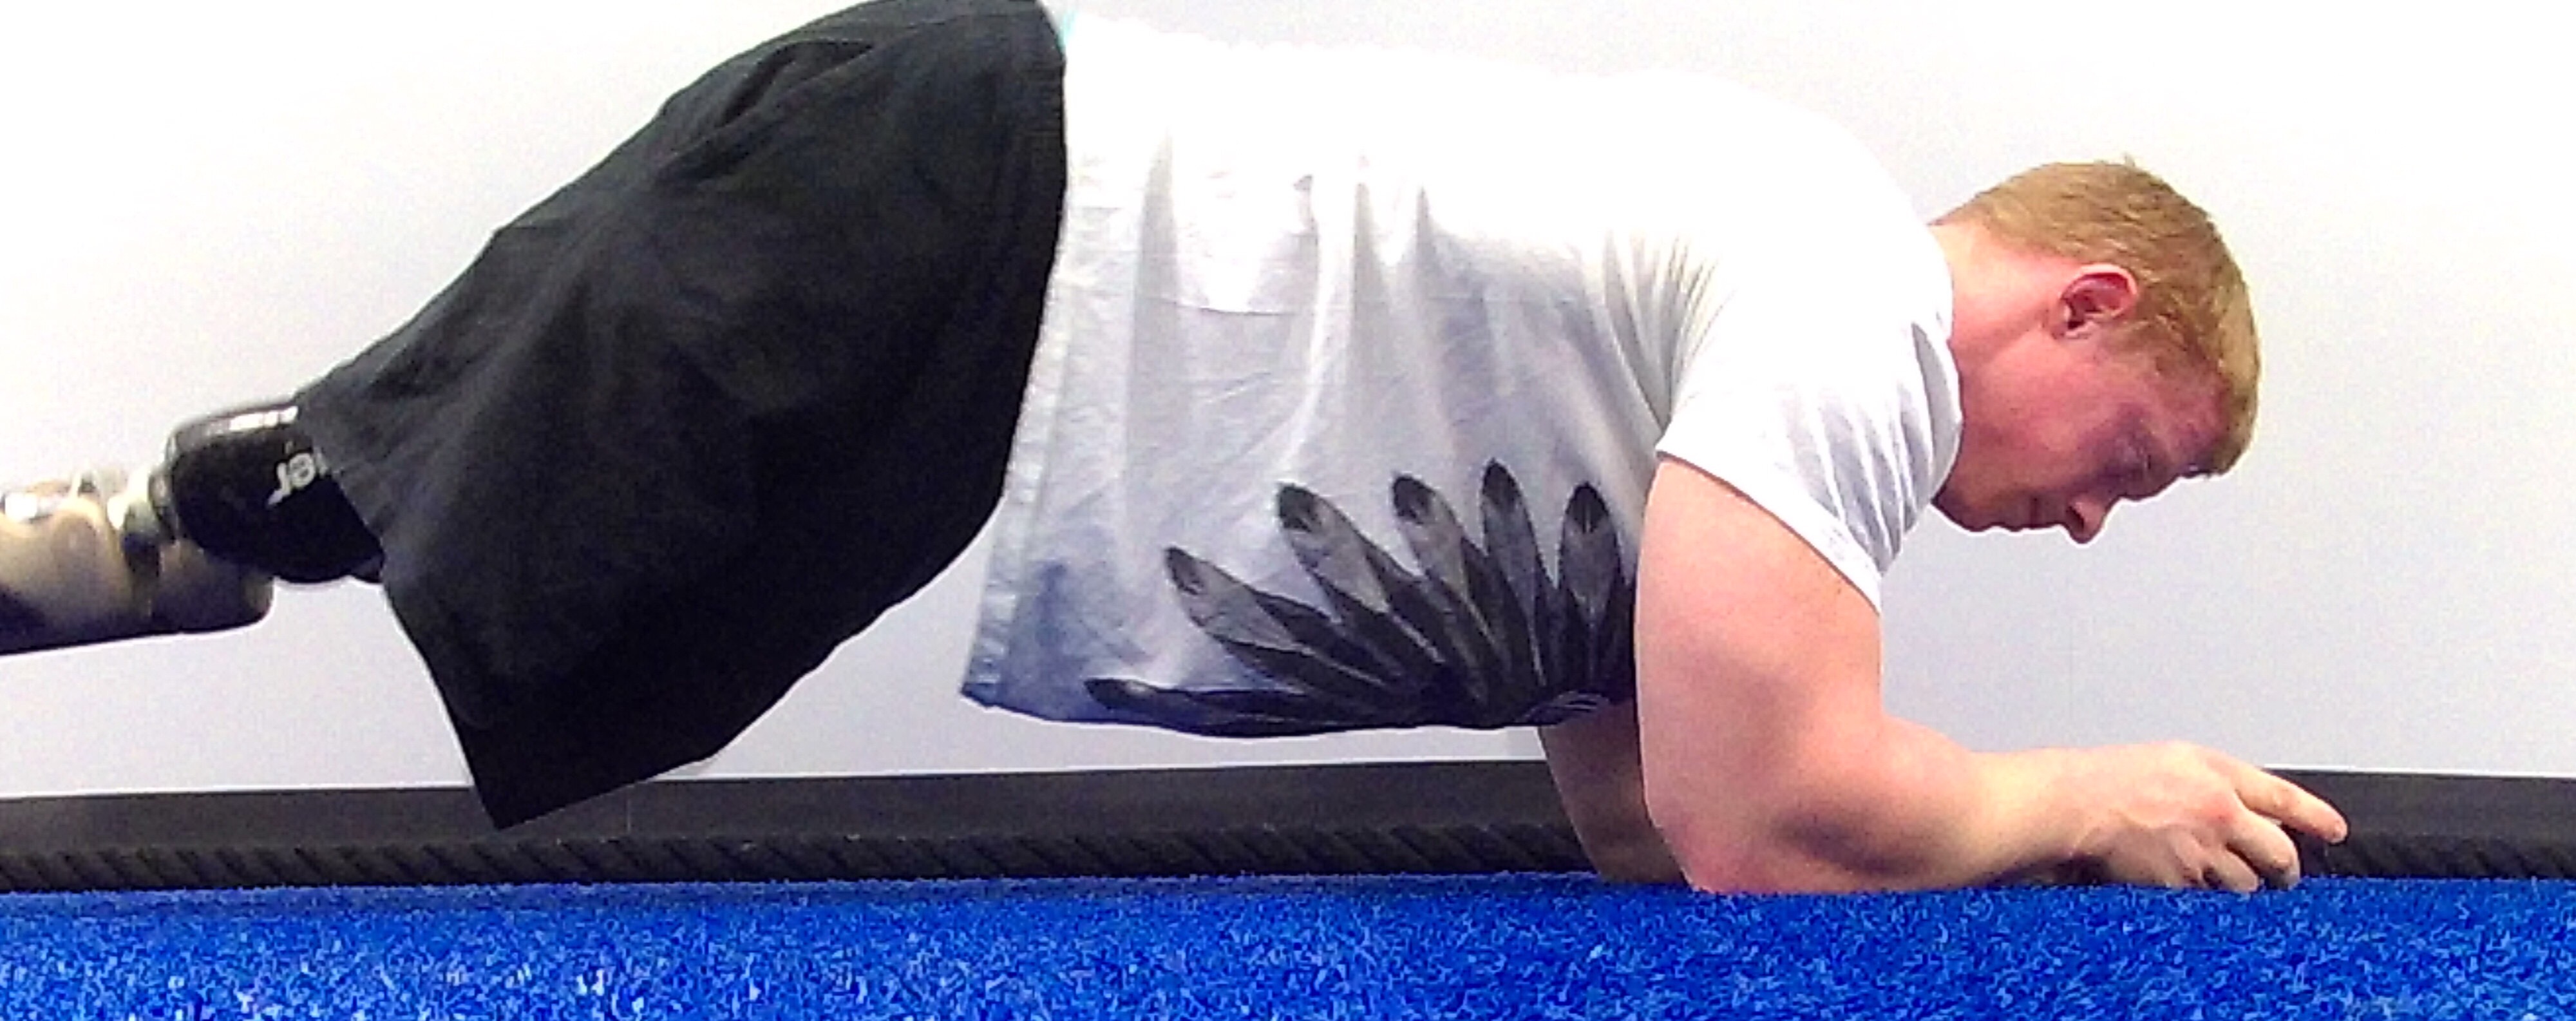
- Bird Dog
The bird dog is a fairly simple, yet underestimated exercise that does a great job to incorporate all of the muscles of the core. When performed properly, it can become a staple in any beginning core stability training program.To properly perform the bird dog, you will start in an “all-fours” position. Your hands will be directly underneath your shoulders, and knees will be underneath your hips. Keep a neutral head, neck, and spine. It is important that you keep your core “braced” and “drawn in” while maintaining normal breathing. Start by lifting one arm off the ground, fully extended and straight out in front of you. Then, lift the opposite leg off the ground in a similar fashion, high enough behind you that it is even with your glutes. Hold this position for 2-3 seconds, and then slowly lower both limbs before switching sides. 2 or 3 sets of 10-12 repetitions works pretty well on this.
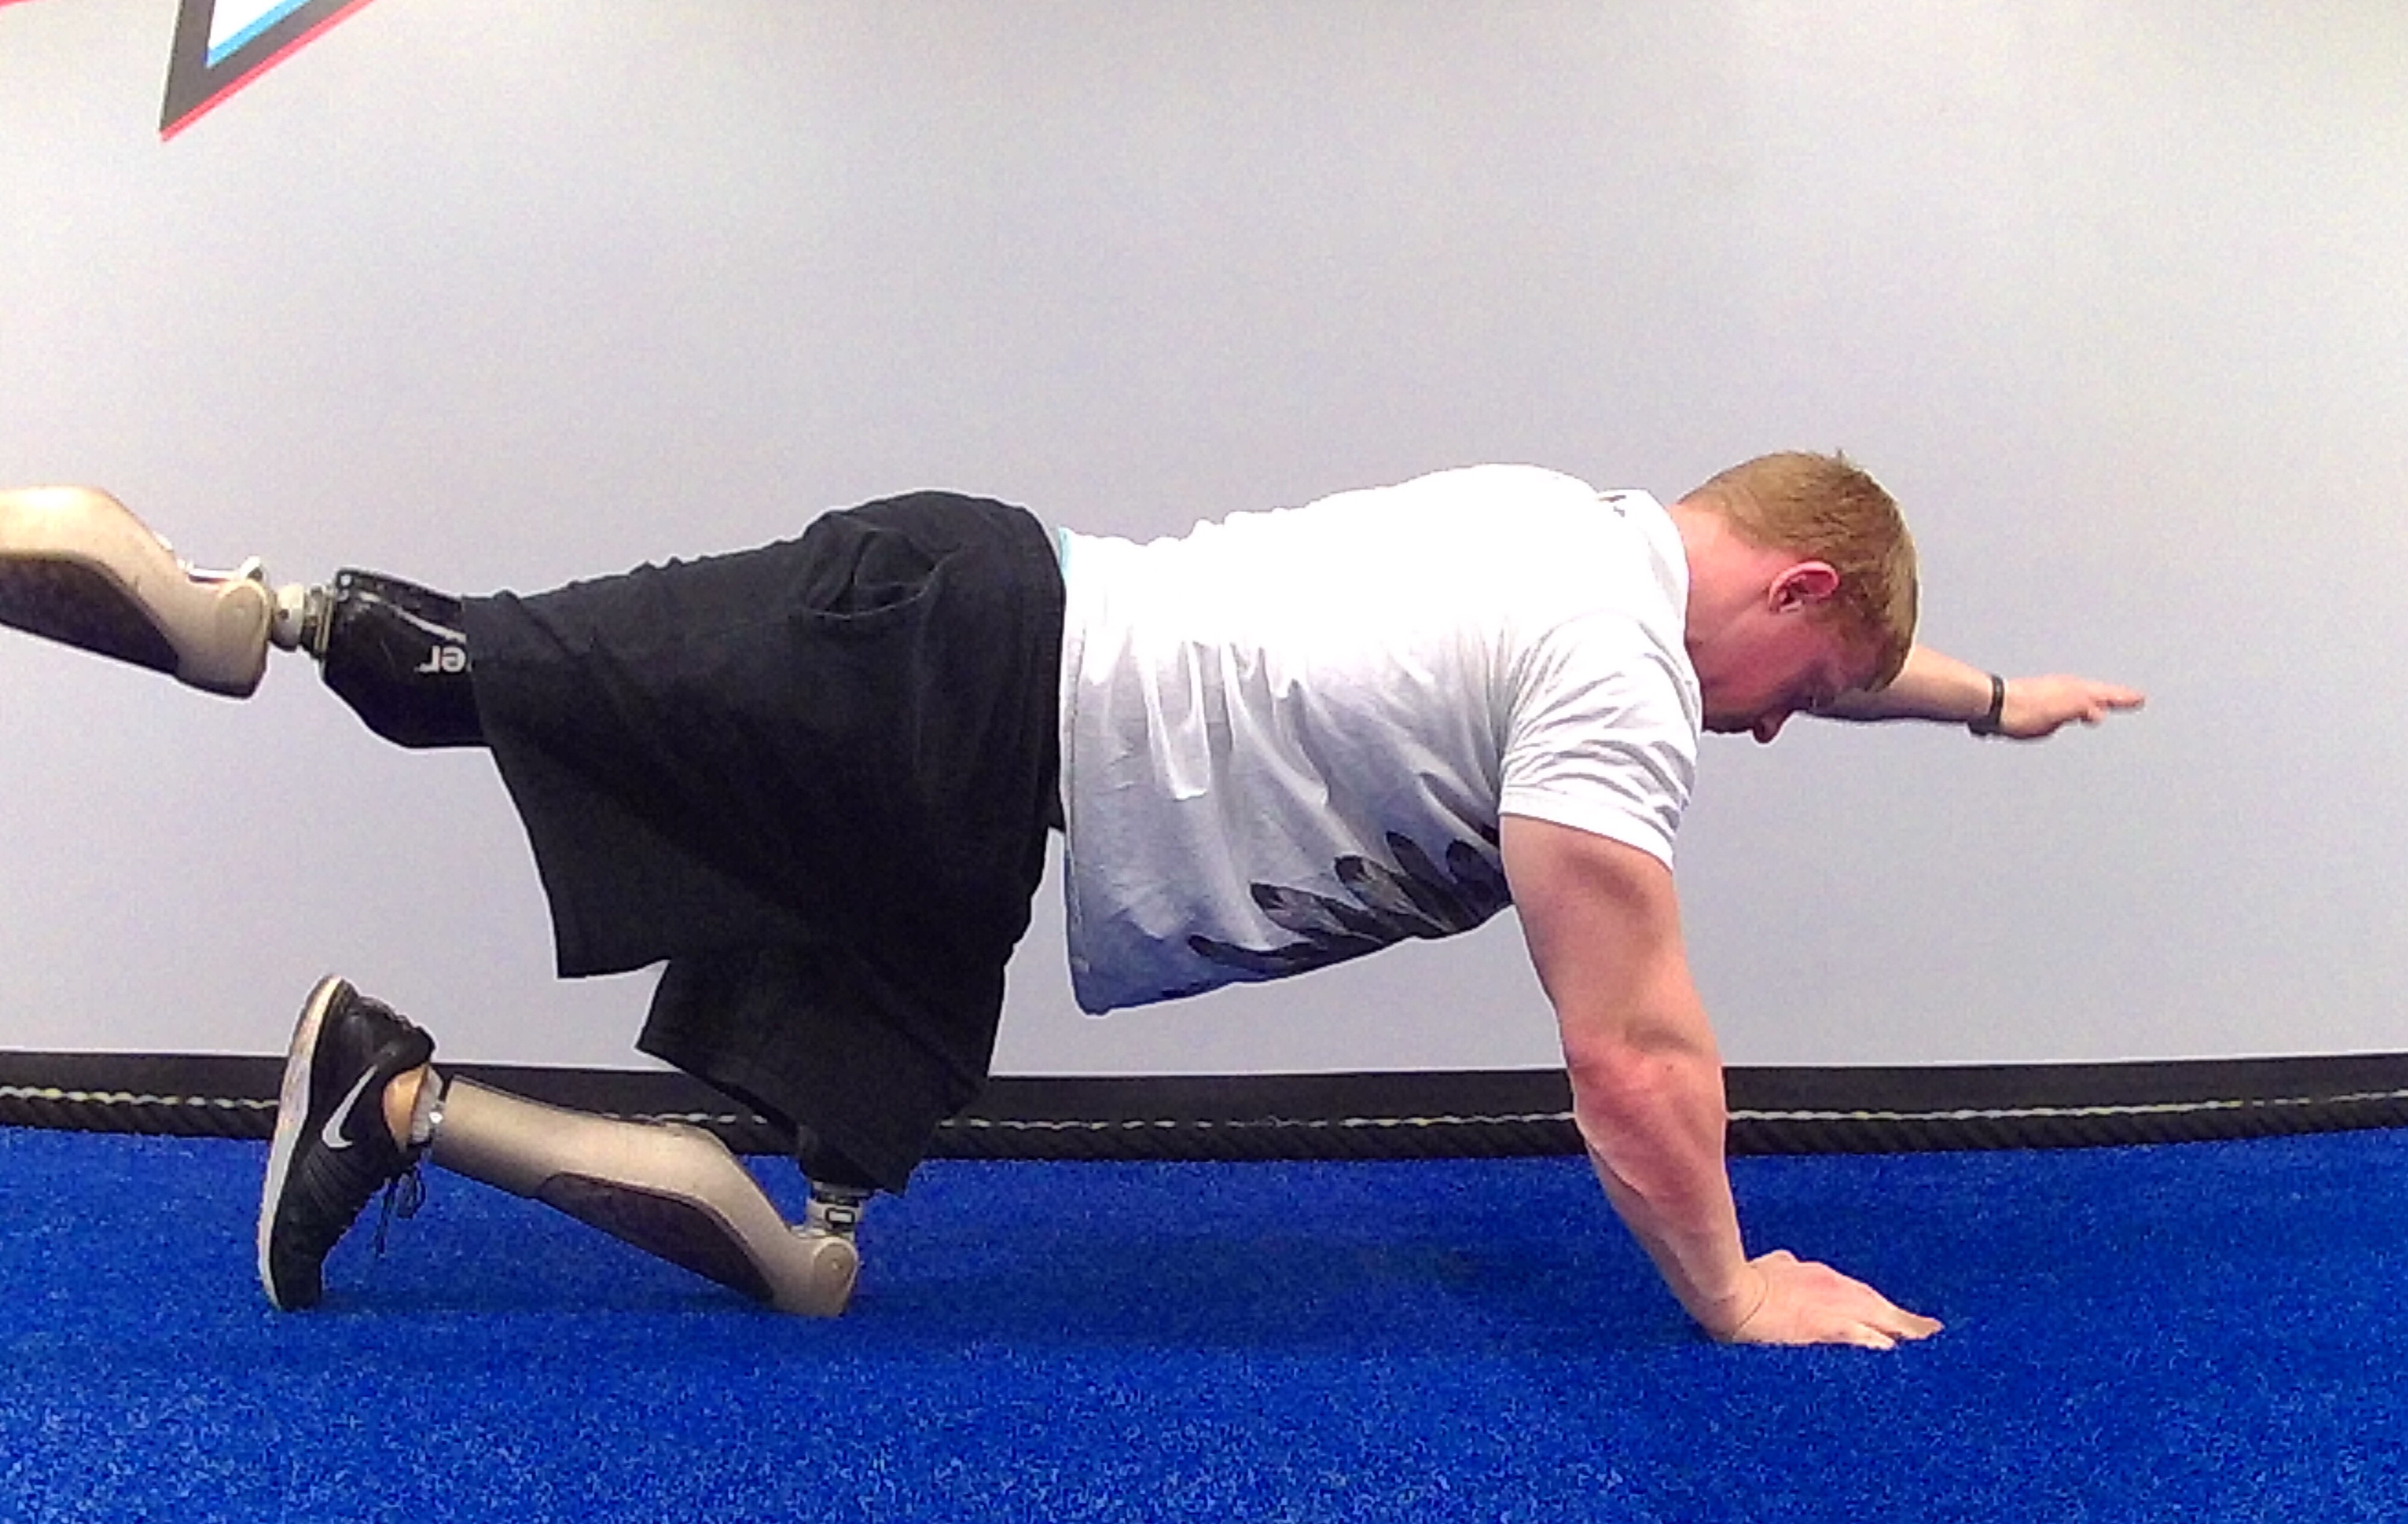
- Plank
The plank is one of the fundamental core exercise that every one of my FitBunch clients learns when they are first starting out. It’s really a great go-to for building all around core strength, especially as you’re starting out, and there are plenty of ways to progress it! The plank begins with your elbows on the ground, forearms parallel. Keep your elbows directly below your shoulders, as this will be a key balance point. Your legs will be straight out behind you. To properly perform a plank, you must be able to keep your knees locked out. This can be a tricky maneuver with an articulating knee(s) – still, it’s not impossible, and if you have to perform a regression (such as putting your upper body on an elevated surface like a table or bench), it’s well worth it! Keep your abdominals braced (THINK: belly button drawn in towards the spine, stomach braced like you’re expecting a punch) and glutes tight (squeeze your buttocks together). It’s imperative to keep your hips, spine, and neck in a strong neutral position. That’s it! This isometric hold is a fairly simple exercise, but is frequently improperly performed – videotape yourself to ensure your lower back and hips aren’t sagging (keep them roughly in line with or slightly higher than your head). Start with 10-20 seconds, and work your way from there. Once you reach being able to hold the plank for a minute, it’s worth progressing (we will go over some progressions in a future article – you need any help, reach out to me).
- Side Plank
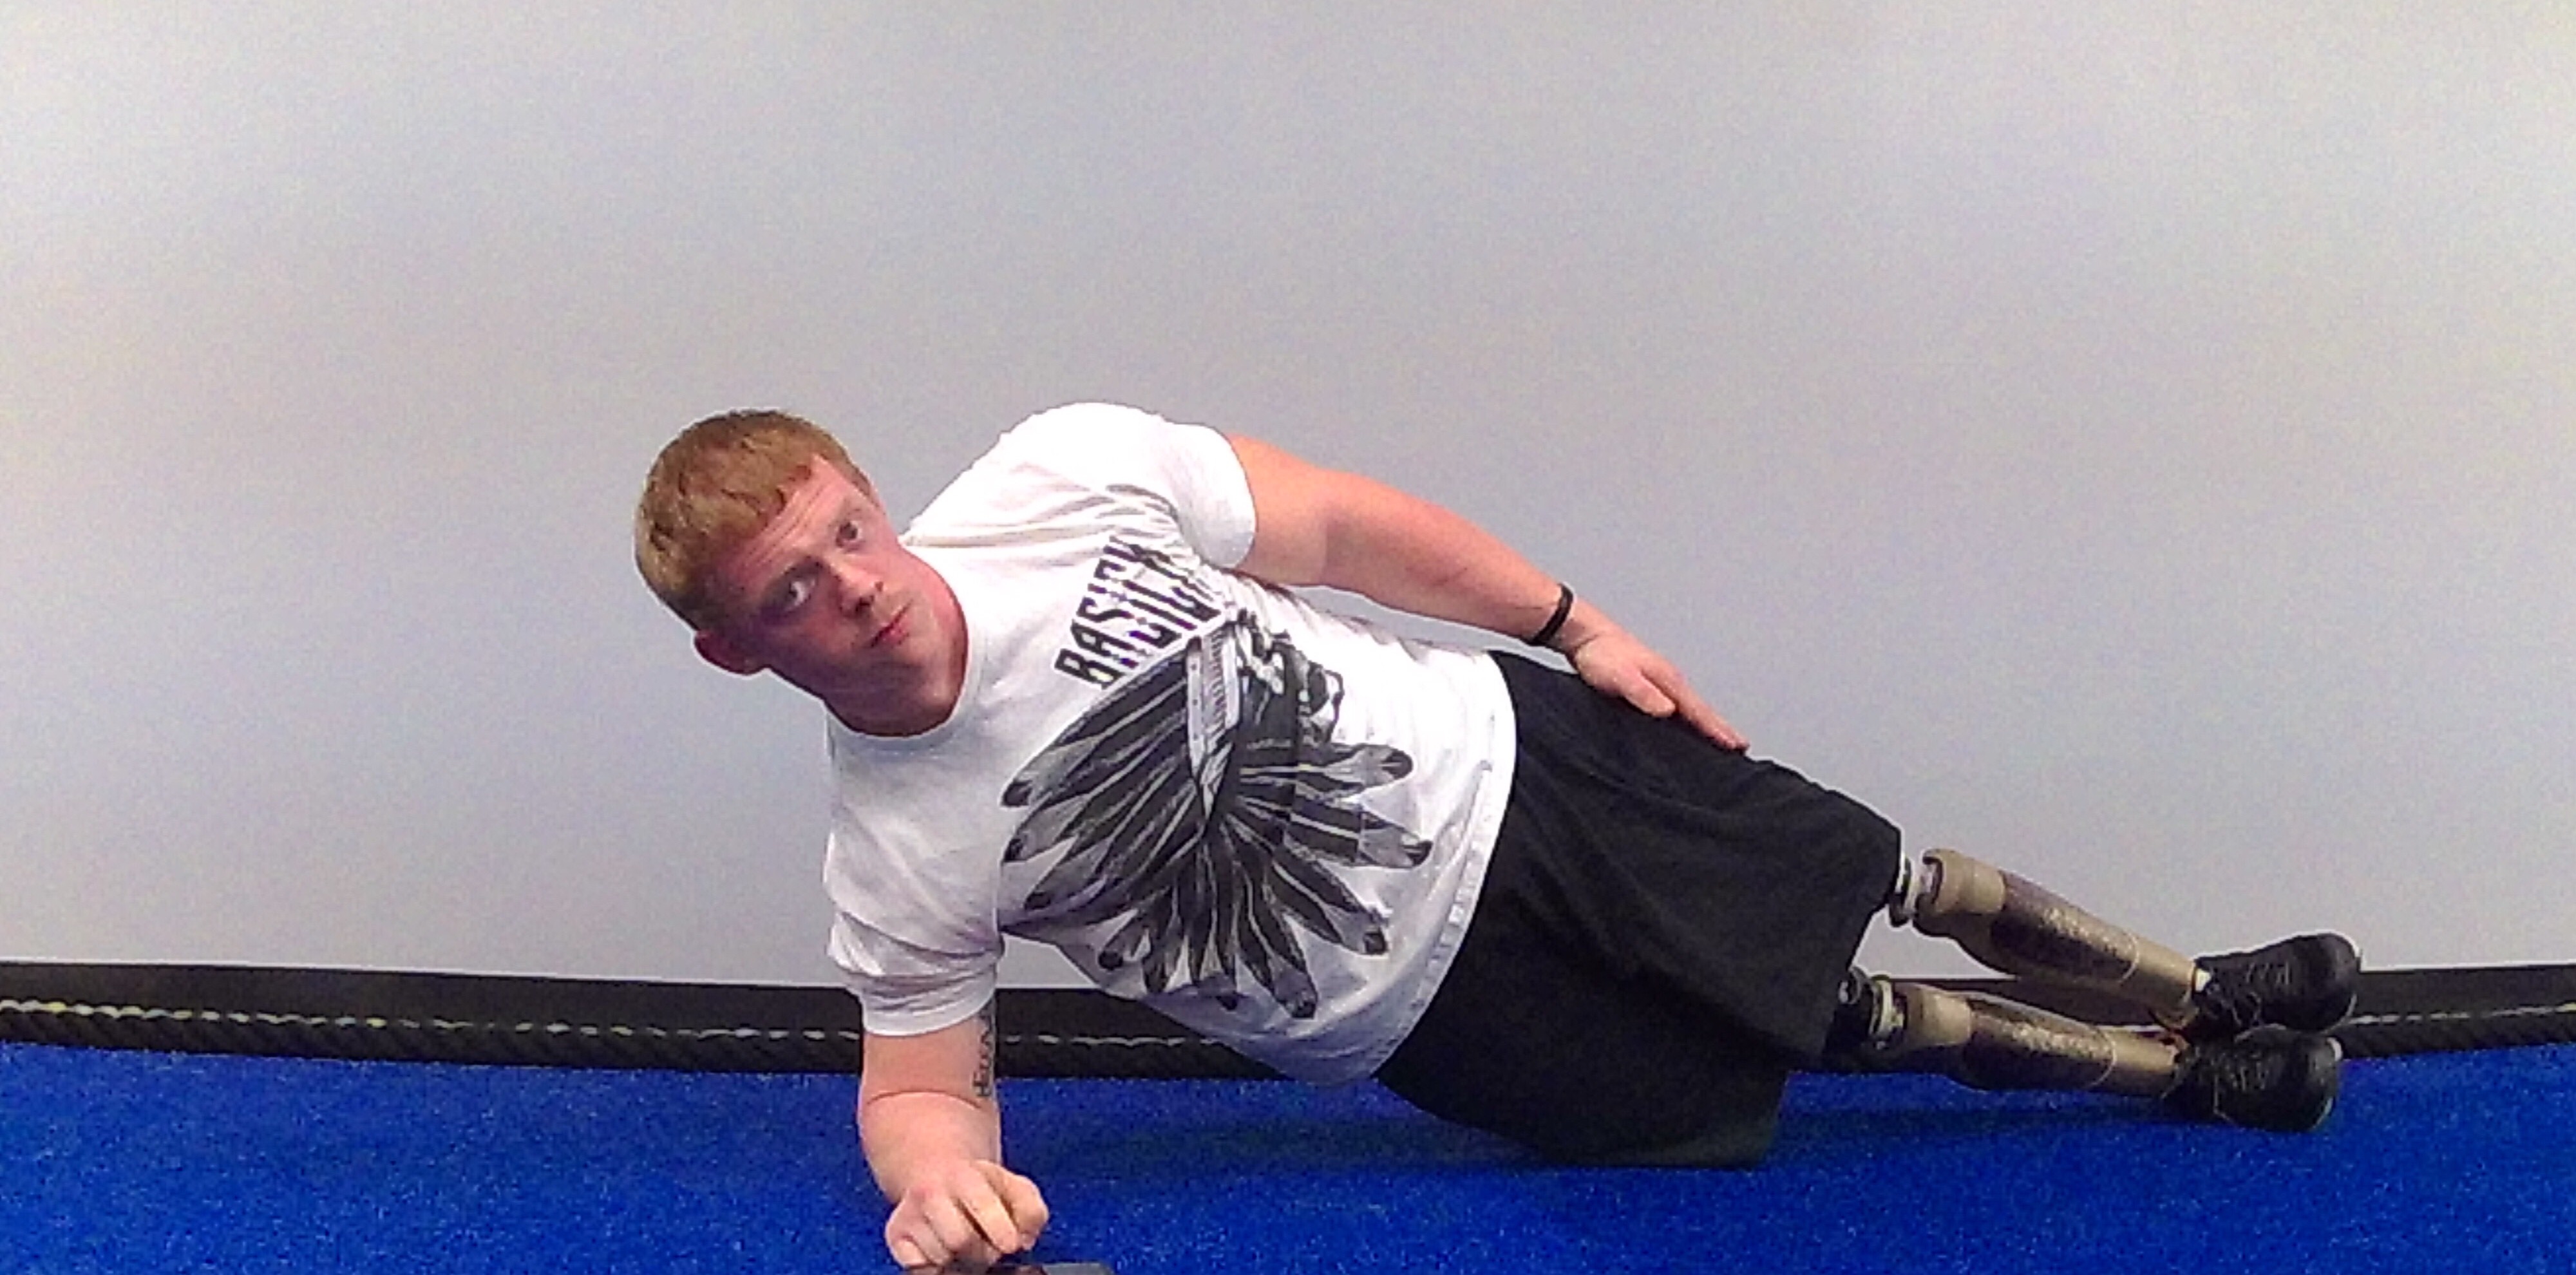
The side plank (or side bridge) is exactly as it sounds- a plank, performed on your side. To start, lie on either your right or left side with a straight line from your head to your feet. You will place your forearm perpendicularly (forming a “T”) with your body, with your elbow directly underneath your shoulder. From this position, contract your abdominals, and raise your hips off the floor. As with the regular plank, it’s important to maintain a neutral neck and spine from this position. Typically this version of the plank is slightly more difficult to perform than the regular “front” plank, so if you can’t hold it for as long, don’t worry – start with 10-2o seconds, and work your way up from there!
Anti-Rotation (and Anti-Flexion)
Anti-rotation training has come to popularity in the last several years, and with good reason. Your core is designed to stabilize your spine, so it’s a small wonder that some of the best core exercises are those that are built to help resist spinal rotation and flexion. These exercises also serve to protect your lower back from injury, which is a critical point for anyone walking with prostheses.
- Paloff Press
The Paloff press is easily one of my favorite core exercises, one of the first that I show to newer clients. It works well, and with simple execution. The most common setup I use is with the cable station at the gym, but you can also use a resistance band. You’ll place yourself perpendicularly (at a T) with the anchor point, with enough space for constant tension in the cable/band. The cable/band should be aligned with your midsection. Keep yourself in a strong neutral posture – stomach tight, chest tall, shoulders back – press the cable or band straight out in front of you until your arms are almost locked. Hold for 2-3 seconds, and the bring the cable back to you. Do not return the cable or band to it’s “start” position (where there would be no tension) between repetitions. This is a strict control exercise, not weight or power-based, so keep everything in control – focus on your breathing and keeping your core tight the entire time. 3 sets of 10-15 repetitions should do the trick.
- Farmer’s Walk or Suitcase Carry
The farmer’s walk/suitcase carry is a rarely-used but highly useful and functional exercise. Often thought of as “strongman” exercises, the carryover into daily life is exceptional and should be practiced by everyone including amputees! The only difference between the two is that with the Farmer’s Walk, you are carrying a weight in each hand – the suitcase carry only requires one hand. Quite simply, pick up a (relatively) heavy weight and carry it by your side, as you would a suitcase. Starting with lighter weights around 30% of your bodyweight is advisable – focusing on keeping your core tight and chest up, gaze straight ahead. Keep the weight close to your body but don’t rest it against your leg or anything. Your steps should be quick and metered, and will likely be smaller than normal – this is just fine! You can perform this movement with a weight in just one hand, or in both. The goal here, unlike a strongman competition, is not to carry as much weight as possible, but rather to keep yourself upright and keep your core braced – the weight used should be challenging but shouldn’t pose a major fall risk or put you over the weight limit of your prostheses. You can shoot for a certain distance or length of time with which to carry your weight, and work to improve that over time.
- Dead Bug
The dead bug is a humorously named exercise which often elicits a strange look from clients when I tell them they’re performing it for the first time. It’s also one exercise that is definitely up to the person performing it to make it effectively difficult. There are many dead bug variations, but I’m going to touch on just two today, while saving more advanced variations for a future version of this post. In order to perform the dead bug, start by lying on your back (easy enough, right?). At this point, you can keep your legs straight out in front of you, flat on the ground – or you can elevate, pulling your knees towards your chest (this makes the movement much more difficult). Press your lower back into the ground by squeezing your stomach (remember, bracing and drawing in). At this point, you will alternate moving your arms overhead and to your sides. This by itself is not much of a challenge, as is keeping your core constantly braced. If you’d like to progress the movement, hold on to some 5-10lb dumbbells or plates as you’re moving your arms.
Wrap-Up
We’ve gone over a lot of information today, and hopefully you’ve learned a lot. The core is a must-train group of muscles, and proper, integrative training is paramount to success. In the future, I look forward to covering more advanced and challenging core training exercises as they pertain to amputees. If you have any core exercises of your own that you enjoy, drop them in the comments below or shoot me an e-mail! If you need any help at all with the exercises above, let me know – trevor@fitbunch.net. In the meantime, best of luck and happy training! See you in the gym!